
[Post 2 of 10 in the series examining how to build a dailiy fantasy model]
Welcome! In the last post I introduced what we’re going to accomplish here, and now here in this second post we’re going to build a foundation for the model. We’re going to walk through the platform we’re going to build in (Jupyter Lab), the packages we’re going to need and setting up an environment that’s effective for managing the whole lifecycle of our data.
I’m not going to spend a lot of time here in this blog on the functionality or setup of Jupyter Lab/Notebook – their how-to guides are much better at that. So, as we move on we’re going to assume you’re able to create a Notebook in Lab or standalone successfully (down below there are some good resources to get you to that point).
Some resources for installing Jupyter:
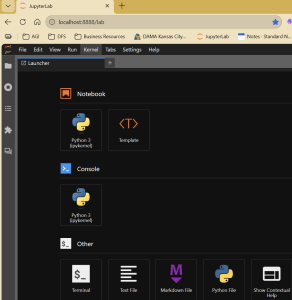
When it starts up, you should get a browser window that looks something like what’s below. As you can see, the Notebook option is the core of what we’re going to be working in, even in Lab:
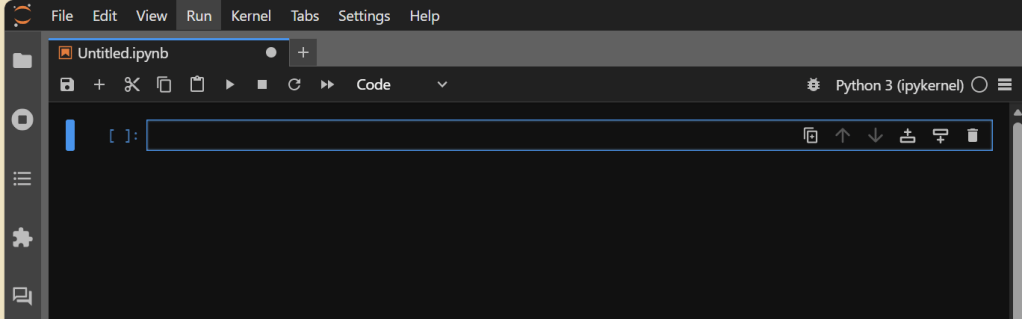
If you click on “Python 3 (ipykernel)” under Notebook (assuming you’re using Python 3; it might be something different for your version), you should get a blank Notebook that looks something like the below. If so: SUCCESS. If not, refer to the docs above or ask AI why you’re getting an error.
Setting up the File Structure
While not a true requirement for what we’re going to do, I find setting up a useful, logical file structure is important for sanity. I would encourage you to do the same, unless you’re someone who thrives in chaos, eschews structure, and can explain quantum physics in a way that makes sense to 99.38% of the population. But you do you. 🙂
Regardless, even more importantly than having a structure is having one that works for you and how you think and work. Mine is below, but yours may vary and that’s OK. You can create these folders in File Explorer or in Jupyter Lab itself – there is nothing special about them.
My structure is pretty simple:
- models, which hold the various models.
- data, which houses data and has a number of sub-folders for different types of data
- raw_data, for what we pull in from Statcast, etc.; I leave that data untouched here so if I want to go back and do something different with it I don’t have to re-download it.
- processed_data, which is where I put raw data that’s been transformed in some way – augmented, cleaned-up, etc. I keep this separate from raw_data so I can always see my starting point and use it if I don’t like my transformations.
- sample_data, which is where I drop (usually) 1k- or 5k-record samples of larger data files. Some of my data files are hundreds of thousands of records and comprised of 200+ fields, so trying to open/look at the full dataset in Excel (my tool of choice for several things) or Google Sheets is simply not feasible.
- metrics, which is the place I put my aggregated metrics that ultimately flow into the models.
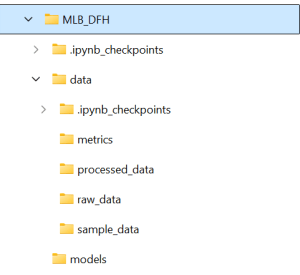
Don’t worry about the .ipynb_checkpoint folders – they’re created by Jupyter and store various checkpoints so when you accidentally close your browser you don’t necessarily lose the last ten hours of work.
The structure itself is secondary – we’re going to create variables that house the paths to these folders so we’re not typing in long strings each time (error-prone approach), and if we choose to change our structure mid-project (been there, done that) it’s an easy change. What is primary, though, is that you have a structure if you want to follow along effectively here. You will quickly see throughout this that I much prefer a modular/variable structure to hard-coding things, and this is one of those areas. You could choose to hard code if you wanted to, but you’re on your own if you do. 🙂
Installing the Packages
The core of our Notebook functionality is going to come from packages. Could we do everything on our own, truly from scratch? We could, but a) I’m not versed enough at this point to do all of that, and more importantly b) why would we do that when great coders like James LeDoux and Moshe Schorr have already not just built and maintained that, but put it out there for us to use? That’s not cheating – that’s leveraging your available assets.
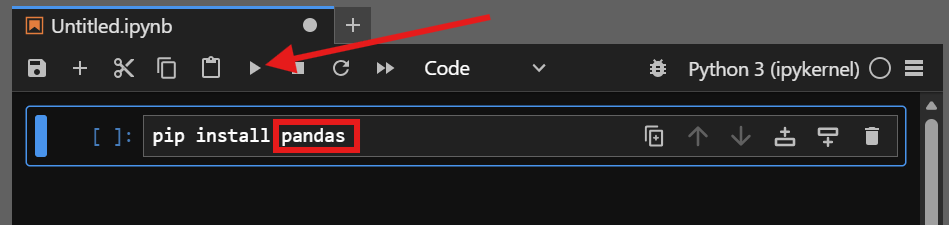
There are two main types of packages we’ll be installing – those that retrieve our data and those that handle the manipulation and modeling of it. In all cases, you should be able to install them (or any other Python package in the library) by typing in the below in an empty Notebook block and then either pressing Shift+Enter or hitting the “run” button for the cell (right-facing triangle).
pip install [package name]
Core Modeling Packages
Here is the list of packages I install as a matter of course when I start. We will also install more as we go along (this is not an exhaustive list, by design), but to get us started these are the core modeling packages we’ll want to install.
pandas
for data wrangling and manipulation
numpy
for numerical computing functions
matplotlib
for some basic visualization capability
Data Retrieval Packages
There are two specific packages I pull for my MLB modeling. There is somewhat of an overlap between the two which is why I have both. Go ahead and install them.
pybaseball
A wrapper for Statcast data, including historical (important)
MLB-StatsAPI
A wrapper package for MLB stats, including schedules
Testing the Packages
To test that all five of those installed correctly, type this in a blank cell in your notebook and run it (Shift+Enter or the “run” button on the toolbar):
import pandas as pd
import numpy as np
import matplotlib
import pybaseball
import statsapi
If you don’t get an error congratulations – you’ve got the foundation of the lab built. If you do get an error that doesn’t make sense to you as an easy fix (typos, case-sensitivity, etc.), just copy/paste the error into your favorite generative AI (Gemini, Claude, ChatGPT, CoPilot, etc.) and ask it to troubleshoot for you. You don’t need to do this the hard way. Remember: leverage your available assets.
In the next post we’ll start retrieving some of our data. If you want to get a head start on that, click on the links above for pybaseball and statsapi and explore the documentation. I would also encourage you to look at some of the MLB Statcast docs, just to get a primer (you can find it here) – this is the lifeblood of what we’re building, so knowing what’s there is a good start.
Until next time!
Affiliate Disclosure: I’m a big fan of transparency, so I want to make sure you know that on this site you may find certain links to products or services that I’m an affiliate of. This means I may make a commission for any purchases you make using those links. If you are not comfortable with that that’s completely fine – you can feel free to find the same product or service other ways and it won’t hurt my feelings. I keep my affiliate links minimal and use them only as an opportunity to help offset costs while helping others.
Affiliate links:
DailyGrind. Daily fantasy sports predictions.
OddsShopper. Betting optimization tool.
